Disclaimer: this post was taken from my personal blog, so for those of you feeling a little de ja vu, my apologies!
There are so many people who just don't seem to get it when it comes to mascara and curling eyelashes. I find lashes to be a fairly important feature (read: crucial!) when it comes to makeup. Like the icing on a cake.... Cue blog post.
I consider myself to be a bit of a LASH MASTER. You can tell me how you have short, stubby or really thin lashes, but somehow I'll still make you look like this ----->
What's that you say? You don't WANT to look like you're wearing feather dusters on your eyelids? Oh come on....
Alright fine. I'll tone it down a bit for you.
There are three important aspects to fab lashes: curling the lashes, mascara and application technique. Let's delve into all three, shall we?
CURLING
Most men and makeup-challenged women will look at an eyelash curler and see a medieval torturing device. BE NOT AFRAID. If 12 year-olds can do it, so can you.
The tool of choice: The shu uemura. It is, as their site states, emblematic.Curling should be done before any eye makeup is applied. Open the curler, position the silver top bar right down along the lash line and against the lid, take a few seconds to make sure all the lashes are in between and then press together. This spot on the lashes is where you want the most bend, as it will make your lashes appear longer from straight on.
BUT, don't stop there! Move the curler out a bit on the lashes and pinch them there gently, move it out a little further and pinch there too. Look closely at your eyelashes, though, as you don't want the tips to be pointing back towards the lids. That indicates you've curled too much at the midpoints.
MASCARA

Everyone has their own preferences when it comes to mascara. I, for one, can't wear anything but waterproof. I can't explain it, but NON waterproof makes my pre-curled lashes straighten back out. Frustration ensues. So, I don't fight it and stick to the WP formulas.
While it's difficult to find that one kind that works well on everyone, I think I may have found a contender or two....
#1 Budget Fave: CoverGirl Lash Blast - While I tire of the "Fat
 tube = FAT lashes!" concept, I love this stuff - both the formula and the brush. Although it's a bit TOO fat at the end for those little corner lashes and lower lashes. For this, I recommend a tag-team approach using Maybelline Lash Discovery.
#2 Splurge Fave: Chanel Inimitable - Ahhhh perfection. For a mere $30 a tube, it can be yours. :::pauses::: My thoughts exactly.
APPLICATION
For many mascaras, a brand new tube means too much product comes out on the brush. A quick swipe through or dab on a piece of paper, paper towel or rough (so as not to leave lint) tissue/toilet paper should solve those goopy messy woes of a new tube.
Wiggle the brush side to side at the roots of the lashes to get the bristles in between them. Move the brush outward, continuing a little of the side-to-side to get a good coating. Add a couple more swipes to complete the first coat.After you've finished up the "first coat," it's important to take this moment to separate your lashes while they're still tacky from the mascara.

I SWEAR by metal eyelash combs a la the one at right by Tweezerman ($8). Nothing works better to really get in there, separate the lashes, get rid of gobs and make them look feathery.
Once you've done some separating, you can apply another coat. Annnnnd again, grab your comb and separate. This repetition will build up the thickness of the lashes while maintaining the separation.
Voila.
Hope this masterful enlightenment (cue the gong) brings you to a new level of lashiness.
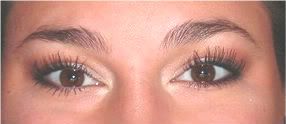
^^ my real lashes! ^^
I have never heard of or seen an eyelash comb. . . . but I want one!
ReplyDelete