Meet Elizabeth Dehn: "Lifestyle" Editor at Minnesota Monthly magazine. She talks everything fashion, retail and beauty for the local mag. Elizabeth recently started to bring her beauty product reviews and experiences to the world of social media and because of it we are all the more educated.
Beauty Bets
My favorite aspect of this blog is Elizabeth's unique perspective: she has access to new, sometimes not-yet-available-to-the-public products and treatments. It's a part of this lucky lady's job to give consideration to these things thrown her way (assuming they're editorial worthy, of course) and she documents her findings for our benefit.
Two recent favorites: Matte About You and Quick Fix
While you're at it, explore the rest of her fabulous world here on the Minnesota Monthly Fashion & Shopping page.
Monday, August 31, 2009
My BEST skin advice.
It's very simple. And also free! Can you beat that?? I think not.
Without further ado....
THE HOT WASHCLOTH
I touched on this in the "Hey there, bright eyes!" post, but wanted to explore the idea further. As someone who's had varying skin issues, I can tell you that this very easy addition to my usual cleansing routine has made a WORLD of difference for me. So trust me that this is tried and true.
The hot washcloth "technique" isn't complicated, nor does it really require much explanation. The heat makes both your cleansing process and the products that follow all the more effective. It opens your pores, meaning that it's easier to clean out the gunk of the day and then soaks in those products used after the fact.
Cue awesome metaphor:
If you think of your skin as a tupperware container (I told you it was awesome), you would never wash the container with the lid still on, as it wouldn't be effective. Nor would you put your leftover ___ on top of the closed container. The heat opens up yourpores tupperware containers so you can properly clean them and fill them with whatever your heart desires...
The new routine
Remove eye-makeup
Hot washcloth for a few minutes (I'll re-wet it twice to refresh the heat factor)
Cleanse
Treatment products
Moisture/SPF products
xoxo,
KM
(And now I'm imagining a tupperware container filled with clearasil and moisturizer.)
Without further ado....
THE HOT WASHCLOTH
I touched on this in the "Hey there, bright eyes!" post, but wanted to explore the idea further. As someone who's had varying skin issues, I can tell you that this very easy addition to my usual cleansing routine has made a WORLD of difference for me. So trust me that this is tried and true.
The hot washcloth "technique" isn't complicated, nor does it really require much explanation. The heat makes both your cleansing process and the products that follow all the more effective. It opens your pores, meaning that it's easier to clean out the gunk of the day and then soaks in those products used after the fact.
Cue awesome metaphor:
If you think of your skin as a tupperware container (I told you it was awesome), you would never wash the container with the lid still on, as it wouldn't be effective. Nor would you put your leftover ___ on top of the closed container. The heat opens up your
The new routine
Remove eye-makeup
Hot washcloth for a few minutes (I'll re-wet it twice to refresh the heat factor)
Cleanse
Treatment products
Moisture/SPF products
xoxo,
KM
(And now I'm imagining a tupperware container filled with clearasil and moisturizer.)
Thursday, August 27, 2009
Hey there, bright eyes!
There are plenty of reasons for one's eyes to look less-than-bright on any given day: lack of sleep, allergies, cold, morning after a fun night out (or a night in spent crying over an episode of Extreme Makeover: Home Edition).... And some folks just happen to have tired looking eyes regardless of outside factors.
Here's my method for combatting sleepy eyes!
1. CHECK YOUR EYES: And I mean the eyeballs themselves,  here. Red? Itchy? Watery? All signs of fatigue (and other things). Plop in some drops -- my go-to kind is Clear Eyes: Dry Eyes + Redness Relief . (I always have to remember the purple plus red logo, or I get confused when standing in the eye drops aisle at Target....)
here. Red? Itchy? Watery? All signs of fatigue (and other things). Plop in some drops -- my go-to kind is Clear Eyes: Dry Eyes + Redness Relief . (I always have to remember the purple plus red logo, or I get confused when standing in the eye drops aisle at Target....)2. CLEANSE: Start with a hot washcloth on your face. Spend a good five minutes by the sink re-wetting and applying it to your face and neck. It'll open up the blood vessels and get that circulation going which will bring you an instant glow. Note that this easy trick will make your cleansing easier and your products more effective!

3. MOISTURIZE: Your skin needs some moisture! Be sure to use an eye cream to help soothe and return moisture to the delicate eye area.
3. MOISTURIZE: Your skin needs some moisture! Be sure to use an eye cream to help soothe and return moisture to the delicate eye area.
4. MAKEUP: Do your face as you like, but this is all about the eyes.
- Dab on a little Benefit Erase Paste (concealer) around the eyes -- this brightening concealer will help bring some light and life back!
- Curl the lashes
- Use a very pale peach eyeshadow all over the upper eyelid (up to the brow) and into the inner eye corner. I use Revlon Matte Peach Sorbet almost daily!
- Use a medium/light neutral brown in the crease/brow bone area to give just a bit of dimension to the eye.
- Dab a little ivory shimmer right under the brow and in the inner eye corner.
- Line the upper lid only with black or brown-black eyeliner from the inside out, and add a little "cat eye" style wing on the outer edge.... just a little one!
- Dab a little ivory shimmer right under the brow and in the inner eye corner.
- Line the upper lid only with black or brown-black eyeliner from the inside out, and add a little "cat eye" style wing on the outer edge.... just a little one!
- Swipe on some mascara and you're good to go!
So many topics!
I'm suffering from writer's block. Which is funny because this is only my third post :-) But seriously, I have so many ideas and I'm having a hard time picking just one! I start to talk about a product and go in to technique, or vice versa.... I could just talk all day about beauty products and advice. It's an addiction, really....
That being said, there are lots of posts to come! So stay tuned!!
That being said, there are lots of posts to come! So stay tuned!!
Tuesday, August 25, 2009
Have you seen my lashes?
Disclaimer: this post was taken from my personal blog, so for those of you feeling a little de ja vu, my apologies!
There are so many people who just don't seem to get it when it comes to mascara and curling eyelashes. I find lashes to be a fairly important feature (read: crucial!) when it comes to makeup. Like the icing on a cake.... Cue blog post.
I consider myself to be a bit of a LASH MASTER. You can tell me how you have short, stubby or really thin lashes, but somehow I'll still make you look like this ----->
What's that you say? You don't WANT to look like you're wearing feather dusters on your eyelids? Oh come on....
Alright fine. I'll tone it down a bit for you.
There are three important aspects to fab lashes: curling the lashes, mascara and application technique. Let's delve into all three, shall we?
CURLING
Most men and makeup-challenged women will look at an eyelash curler and see a medieval torturing device. BE NOT AFRAID. If 12 year-olds can do it, so can you.
The tool of choice: The shu uemura. It is, as their site states, emblematic.Curling should be done before any eye makeup is applied. Open the curler, position the silver top bar right down along the lash line and against the lid, take a few seconds to make sure all the lashes are in between and then press together. This spot on the lashes is where you want the most bend, as it will make your lashes appear longer from straight on.
BUT, don't stop there! Move the curler out a bit on the lashes and pinch them there gently, move it out a little further and pinch there too. Look closely at your eyelashes, though, as you don't want the tips to be pointing back towards the lids. That indicates you've curled too much at the midpoints.
MASCARA

Everyone has their own preferences when it comes to mascara. I, for one, can't wear anything but waterproof. I can't explain it, but NON waterproof makes my pre-curled lashes straighten back out. Frustration ensues. So, I don't fight it and stick to the WP formulas.
While it's difficult to find that one kind that works well on everyone, I think I may have found a contender or two....
#1 Budget Fave: CoverGirl Lash Blast - While I tire of the "Fat
 tube = FAT lashes!" concept, I love this stuff - both the formula and the brush. Although it's a bit TOO fat at the end for those little corner lashes and lower lashes. For this, I recommend a tag-team approach using Maybelline Lash Discovery.
#2 Splurge Fave: Chanel Inimitable - Ahhhh perfection. For a mere $30 a tube, it can be yours. :::pauses::: My thoughts exactly.
APPLICATION
For many mascaras, a brand new tube means too much product comes out on the brush. A quick swipe through or dab on a piece of paper, paper towel or rough (so as not to leave lint) tissue/toilet paper should solve those goopy messy woes of a new tube.
Wiggle the brush side to side at the roots of the lashes to get the bristles in between them. Move the brush outward, continuing a little of the side-to-side to get a good coating. Add a couple more swipes to complete the first coat.After you've finished up the "first coat," it's important to take this moment to separate your lashes while they're still tacky from the mascara.

I SWEAR by metal eyelash combs a la the one at right by Tweezerman ($8). Nothing works better to really get in there, separate the lashes, get rid of gobs and make them look feathery.
Once you've done some separating, you can apply another coat. Annnnnd again, grab your comb and separate. This repetition will build up the thickness of the lashes while maintaining the separation.
Voila.
Hope this masterful enlightenment (cue the gong) brings you to a new level of lashiness.
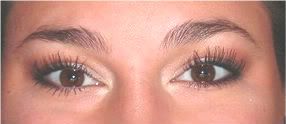
^^ my real lashes! ^^
Monday, August 24, 2009
Welcome!
Hello and welcome to my lovely beauty world.
In an effort to share with you my updates, recommendations and various musings about beauty, I've opted to create a blog. And, fancy that, you've opted to read it!
I'm quite a "newbie" (in the professional sense) in the beauty industry, and just launching into a full-blown career in Cosmetology. I've been doing makeup for others for a good 10 years, but just started my freelance business this past winter in the throes of a flurry of weddings for friends.
I hope you enjoy reading my blog updates as they come. I imagine it will involve some commentary about recent or upcoming clients, website updates, product recs and technique tutorials, as well as some bits and pieces about life at the Aveda Institute.
Comment freely, ask questions, and try things for yourself!
Ciao!
KM
Subscribe to:
Comments (Atom)